


Have you ever wished to customize the appearance of a frequently used website? If so, this article will guide you on how to do it. As a practical example, our goal will be to modify the position of the table of contents in the Laravel framework documentation.
We'll use a Chrome extension called Page Manipulator. This extension allows you to inject HTML, CSS, and/or JavaScript into any web page. The changes you make are automatically applied whenever you visit the specified websites.
How to Install Page Manipulator?
Installation from the Chrome Web Store: You can install the extension directly from the Chrome Web Store.
Installation from Microsoft Edge Add-ons: If you use Microsoft Edge, you can also install it from the Microsoft Edge Add-ons Store.
For more details on installing this extension, refer to the documentation on GitHub.
Modifying the Table of Contents Position in Laravel Documentation
After installation, the extension interface looks like this:

In the extension window, click on the "JavaScript" menu, then on the "New" button to create a new file where we'll place our JavaScript code. Let's name this file "laradocs". You only need to specify the file name. In this file, we'll add the following code:
var title = document.querySelector(".docs_main #main-content :nth-child(1)");
var summary = document.querySelector(".docs_main #main-content :nth-child(2)");
var rightMenu = document.createElement("div");

document.querySelector("body section").insertBefore(rightMenu, document.querySelector("body section div"));

rightMenu.appendChild(title);
rightMenu.appendChild(summary);
rightMenu.setAttribute("id", "right-menu");
This JavaScript code selects HTML elements in the document.
It retrieves elements corresponding to the first and second child of the element with the class
.docs_mainand the IDmain-content.Then, it creates a new
divelement calledrightMenu.It inserts this new element just before the first
divelement inside the body section of the page.Finally, it adds the
titleandsummaryelements as children ofrightMenuand assigns the IDright-menutorightMenu.
This code is used to create a customized right-side menu from specific elements on the page, such as the title and summary. The menu is then inserted into the page's structure.
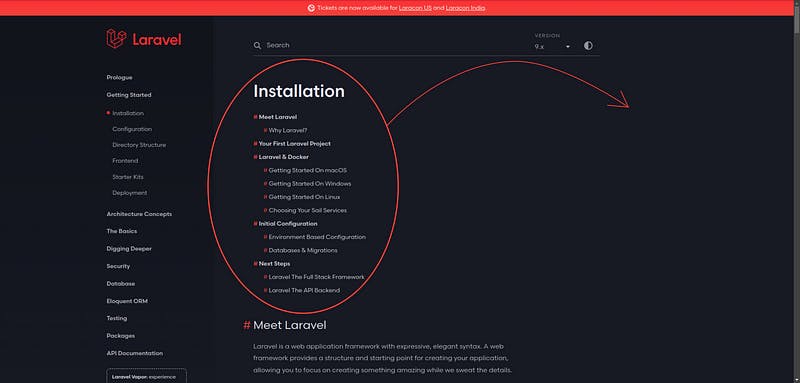
To understand the HTML/CSS applied to the Laravel documentation, I inspected its source code.
Let's now create a CSS file and add the following CSS code to it:
#right-menu {
    float: right;
    color: white;
    position: fixed;
    right: 1.5em;
    top: 8em;
    height: 80vh;
    overflow: auto;
    padding: 0px 1.5rem 0px 0px;
}

#right-menu h1 {
    font-size: 2.5em;
    letter-spacing: 0;
    line-height: 1.125em;
    margin-bottom: 0.65em;
}

#right-menu h1+ul ul li {
    padding-left: 1.5em;
}

#right-menu h1+ul {
    list-style-type: none;
    margin: 0;
    padding: 0;
}

#right-menu h1+ul li {
    display: block;
    margin-bottom: 0.5em;
}

#right-menu h1+ul li a {
    color: #232323;
    font-size: .89em;
    font-weight: 500;
    position: relative;
    text-decoration: none;
}

#right-menu h1+ul ul li a {
    font-weight: 400;
}

#right-menu h1+ul li a:before {
    color: #eb4432;
    content: "# ";
}

.dark #right-menu h1+ul li a {
    --tw-text-opacity: 1;
    color: rgb(215 215 220/var(--tw-text-opacity));
}

.dark #right-menu :not(pre)>code, pre {
    background-color: rgb(37 42 55/var(--tw-bg-opacity));
}

.dark #right-menu :not(pre)>code {
    --tw-bg-opacity: 1;
    --tw-text-opacity: 1;
    color: rgb(235 68 50/var(--tw-text-opacity));
}

#right-menu :not(pre)>code {
    border-radius: 0.125rem;
    display: inline-flex;
    max-width: 100%;
    overflow-x: auto;
    padding: 0 0.125rem;
    vertical-align: middle;
}

#right-menu :not(pre)>code {
    background: #fbfbfd;
    color: #ca473f;
}

#right-menu code {
    color: #232323;
    font-size: .8rem;
    font-weight: 500;
    line-height: 1.9;
}

#right-menu code {
    font-family: source-code-pro, ui-monospace, SFMono-Regular, Menlo, Monaco, Consolas, Liberation Mono, Courier New, monospace;
    font-size: .875em;
    line-height: 1.714em;
}
The CSS code defines styles for a right-side menu (
#right-menu) that floats to the right of the page, has white text color, and is fixed in position.The following CSS rules affect the layout and style of both the menu and its content.
There are also specific styles for a dark mode (
dark) that change text and background colors when dark mode is active.
The global CSS describes the formatting of the menu and its content, while dark mode-specific styles adjust colors accordingly when dark mode is activated.
You can suggest modifications to this code by following this link: https://github.com/bleriotnoguia/update-laradocs-style.
For these lines of code to apply to our site, we need to instruct our extension on the sites where we want this code to be applied. Open the file in the extension window and specify the site's URL, in our case https://laravel.com/. Then, check the "Enable" box.

And there you have it; we finally have a new layout for our table of contents!

Bonus: Adding the "Back to Top" Button to Our Pages
To create a button that allows users to scroll back to the top of the page, you can inject
HTML and CSS code, along with JavaScript code to handle the button's behavior. Here's how you can proceed:

- JavaScript Code: Add JavaScript code to display and manage the button's behavior. Here's an example using pure JavaScript:
// Create the back-to-top button
const scrollToTopBtn = document.createElement("button");
scrollToTopBtn.id = "scrollToTopBtn";
scrollToTopBtn.textContent = "Back to Top";

// Add the button to the end of the body (just before </body>)
document.body.appendChild(scrollToTopBtn);

// Function to smoothly scroll the page to the top
function scrollToTop() {
  if (document.documentElement.scrollTop > 0) {
    window.scrollTo({
      top: 0,
      behavior: "smooth",
    });
  }
}

// Show or hide the button based on page scrolling
window.addEventListener("scroll", () => {
  if (document.documentElement.scrollTop > 100) {
    scrollToTopBtn.style.display = "block";
  } else {
    scrollToTopBtn.style.display = "none";
  }
});

// Add an event listener to scroll the page when the button is clicked
scrollToTopBtn.addEventListener("click", scrollToTop);
This JavaScript code listens to the page scroll. When the page is scrolled more than 100 pixels down, the button appears. When clicked, the page smoothly scrolls its content back to the top.
- CSS Code: Style the button to make it visible and have the desired appearance. For example:
#scrollToTopBtn {
  display: none;
  position: fixed;
  bottom: 20px;
  right: 20px;
  z-index: 99;
  background-color: #007bff;
  color: #fff;
  border: none;
  border-radius: 50%;
  cursor: pointer;
  padding: 10px 15px;
  font-size: 16px;
}

#scrollToTopBtn:hover {
  background-color: #0056b3;
}
This CSS code initially hides the button (display: none;) and gives it a floating appearance at the bottom right of the page.
- Code Injection: To inject this code into a web page, you can use an extension like Page Manipulator or add it directly to the page's source code if you have control over it.
Once the code is injected, the "Back to Top" button will appear on the page as soon as the user scrolls down. Clicking the button will smoothly scroll the page back to the top. You can customize the appearance and behavior of the button by modifying the CSS and JavaScript code accordingly.
Conclusion
The Page Manipulator extension can automatically inject custom HTML, CSS, or JavaScript code into any web page. This allows you to customize any website according to your needs. The extension is currently available on Google Chrome and Microsoft Edge. Note that if the front-end code of the site where you injected code undergoes a major change, your code may no longer work as it relies on the old version of the targeted site.
Resources
Page Manipulator GitHub: https://github.com/Ruud14/Page-Manipulator
Code on GitHub: https://github.com/bleriotnoguia/update-laradocs-style